Welcome back to the Pimp-Out/Showcase Hop!!!
Brought to you by Deezy Does It!
This "Weekly" Pimp-Out/Showcase Hop is to gain new followers as well as bring more traffic to your blog and at the same time receive greater exposure. It is also a great way to meet other bloggers, exchange ideas, get great tips and learn new techniques; all while showing your "art".
Before we begin, there are just a few simple rules to the hop.
1. Follow the Host (first link):
3. Link up below using Linky Tools.
4. Visit at least 3 blogs from the linked up list below and leave a comment. Let them know you came from the Weekly "Pimp-Out/Showcase" Hop and inform them you are a follower so they can return the favor.
~Please remember that if someone from the hop follows you, be sure to return the favor~
This week's Pimp-Out/Showcase belongs to Tammy from Life-Up, Down and Sideways.
I started blogging my crafty creations just over two years ago when I created Cuttin' and Stampin'. It was my way of sharing some of my crafty creations to a larger audience and sell some crafty goodies to others. In such a short period of time, the original blog has developed a life of it's own with a Design Team and weekly challenges. This world wide web has allowed me to meet and get to know so many wonderful people and make some truly life long friends. You may not believe it, but I have a real hard time speaking with people in public places. I get all tongue tied and embarrassed about every word that comes out of my mouth.
When I'm not working or crafting, my husband and I do quite a bit of traveling on the back of a GL1800 Goldwing. It's an amazing way to see the country with the wind in your face and being exposed to all the elements. We take long trips that provide me with tons of great pictures to scrap and lots of jounaling to do. We have one son that I used to arm wrestle with to see who got to ride with dad this week. Now he has reached an age where he can travel on a bike of his own. We have a really close knit family an it's great that we can enjoy the road together.
In my excitement, I decided that I wanted to use this opportunity to try something new. I've been watching all of these wonderful videos on making mini albums and keep thinking "How hard can this be?"
I really need to give credit to Angle Wings 14100 off of YouTube. She created an awesome video with great instructions. You can access them here - Tutorial Video
I made my share of mistakes, so give me a little leeway on the creation of my first mini. I started with some Bazzill Kraft card stock and created my cover and all the pages. Then inked around the edges .
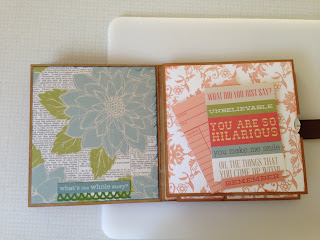
I used the He Said She Said Paper packet from Teresa Collins. There was an additional elements package that contained mini file folders and I tried to make them fit in too.
So here's the front cover of the album. The diagonal card is in a pock and can be changed out. The flower is hooked onto a magnet for the closure. It's pretty plain but with some time to think about it, I'll probably keep adding to it.
So when you open the front cover. There's a pocket on the first page with one of the file folder elements added as a tag. The flap on the right side is also part of a file folder.Here's the flap opened up.
Here's the second pages of the album. I left the big square to hold a nice size photo. The tags on the right side are removable and can be used to mount pictures on the back or do some journaling.
Flip up the page on the right and here's another great spot for a large picture. There's another large photo and journaling spot on the tag that comes out of the pocket. The bottom section is a third page with a magnetic closure.
Here's how the page opens up. Once you fold the page down I used another file folder to create an added spot. Then I used three celo bags that are 3" x 6" to create a section of clear picture or tag pockets.
Then there's another large spot for a picture
I hope you enjoyed my first mini album. It's was an interesting project and I've definitely learned that I need to take a little more time and make sure I have all my folds right before I start gluing things down. Until next time,
Happy Crafting
Tammy
This week’s giveaway is sponsored by Nikki from PPbN Designs (third link). She has a selection of SVG cut files and digital graphics for you to choose from. Pretty awesome prize package too?
To qualify for this week's "give-a-way" be sure to sign up by using Rafflecopter below:
a Rafflecopter giveaway
You are welcomed to "like" the Deezy Does It! Facebook Page to keep up with the up-coming Pimp-Outs/Showcases.
Each week we will showcase a "blog"! If you are interested in being "Pimped-Out/Showcased", please contact me for an available date. All submissions need to be in by Wednesday, a week before your scheduled Pimp-Out/Showcase post date, 8pm est.
You may also contact me if you're interested in sponsoring a "give-a-way " for a "Pimp-Out/Showcase" hop!
Be sure to come back on Wednesday for winner announcement. Winners must respond to winning email from rayzn.kane020406@gmail.com within 48 hours or a new winner will be chosen. Winner will be notified by email and displayed on the Rafflecopter
All entries will be verified. Be sure to read all Terms and Conditions on the Rafflecopter. Deezy Does It! Is not responsible for prize fulfillment.
Some Sponsors may require winner to pay shipping. This Giveaway is in no way connected to or sponsored by Facebook. Sponsors reserve the right to substitute prizes of equal value.
Grab Our Button

"L'amor che move il sole e l'altre stelle" "The love that moves the sun and other stars" (Eat, Pray, Love)


Cool tutorial! I always buy scrapbook paper because it seems cool but never know what to do with it!
ReplyDeleteThanks for the party. Come visit if you have time.
ReplyDeleteAngel
Thanks Deezy.
ReplyDeleteTammy S.
Love this tutorial! Such a cute project. :)
ReplyDeleteDorothy
Very cute. I always love it when instruction is given. Loving the final project! Thanks for sharing. BIF
ReplyDeleteGreat project. Another great showcase also
ReplyDeleteThank You for the tutorial:) Your album is simply beautiful and I love everything about it! Thank You for sharing.
ReplyDeleteBIF:)
Wow, that's pretty good for your first mini album! It looks very complicated but you made it beautiful!
ReplyDeleteChristine Barker
BIF
http://scarletcalliope.wordpress.com
oh wow! What a great set of papers you have chosen to use! Happy BIF day!
ReplyDeleteThanks for the party!
ReplyDeleteTammy this is a beautiful album. And I love this paper by MME. I have the small 6x6 paper pack. TFS AJ-
ReplyDelete